CLICK HERE FOR FREE BLOGGER TEMPLATES, LINK BUTTONS AND MORE! »

Friday 28 October 2011

Dad's Birthday

Good morning bloggers and thank God its Friday. I have been looking forward to this weekend because of the one hour extra sleep and also its my dad's birthday on Tuesday. So I made a card the celebrate the occasion. The card is based on the sketch from Sketch N Stash.


Its a Swinging Z - fold card. The paper used is called Amore from Shabby Princess while the digi image (Vintage Red Car) and sentiment is from Create with TLC ( guess it obvious I like the digi images from Create with TLC).


 The twine and the adhesive shimmer dots are from my neglected stash. Instructions on how to make the swinging fold card can be found at SCS.


 I will be entering the card for the following challenges
Sketch N Stash - Challenge 73
Scrapbook Sisters - Anything goes


Until next time, happy crafting.

Thursday 27 October 2011

Petal Card

Hello and welcome. Lol-ween (that's what Disney is calling the Halloween season) season is in the air, so I made a card using one of the Halloween colors. The card is a petal card featuring a digi image from Create with TLC called Vintage Child Butterfly. The backing paper is from Pixiedust.


Instruction on how to make a petal card can be found at SCS.
I will be entering this card for Craft Your Days Away Challenge - Halloween Colors.
Until next time, happy crafting.

Wednesday 26 October 2011

Gel Card

Today is the day that the Lord has made, we will rejoice and be glad in it. This is saying a big hello to everyone and welcome to my blog. The card I will be sharing today is a Gel Card. All you need for this project is a zip lock bag, some hair gel, card stock and some patterned paper. The gel creates a three dimensional look and makes you image appear as though its under water. Instructions on how to make this card can be found at SCS.


The image is called Dundee from Mo's digital pencil and the papers used are from Shabby Princess - The Shabby Fall collection. The sketch am using is from CPS.

I will be entering the card for the following challenges:
Card Positioning System (CPS) - CPS 241
Craft Your Passion - Lets get Krafty
C.R.A.F.T Challenge - Autumn
Oldie But A Goldie - Forever Autumn: Autumnal images or colours

Until next time, happy crafting.

Wednesday 19 October 2011

Sketch Challenge

Hello again everyone and welcome. Today I will be sharing my latest card which is a rocking card. I designed the card using the sketch from the Fetch A Sketch challenge. The challenge is a nice one, you are to design a card using the sketch below:

Bonibleaux Designs and Dude Time Doodles is offering the winner of the challenge a $10 Gift Certificate.


My card was designed using backing paper from Pixiedust's. The topper is a sentiment from Create with TLC. I matted and layered it after I had paper pierced the rose on the sentiment and then cut it up and arranged it to give me a brick look. The flowers are handmade from circles which I distressed, sprayed with water, crumbled and then held together using a brad.


I  will also be submitting the card for the challenge at One Stitch At A Time which is titled "Shape Up". The challenge is sponsored by Joanna Sheen.
Until next time, happy crafting.

This card is also suitable for the following challenge:
NettieG's Digital Gems Challenge - "Anything but a Rectangle"

Tuesday 18 October 2011

Pink, Pink and more Pink

Hi everyone and good afternoon. Today at Sentimental Sunday  is the challenge "Fancy Folds" plus a sentiment and it is sponsored by Paper Loves Glue. The winner gets 3 yards of ribbon in any colour of there choice. For this challenge I will be submitting a side step card.


The digi image "Vintage Lady and Her Dog" is a download from Create with TLC same as the sentiments. The roses were handmade by me. The backing paper is a download from Pixiedust's.
I will be submitting the card also for this week's challenge at Craft your Passion which is titled "Double up with Pink".

Until next time, happy crafting.

Thursday 13 October 2011

Friend Like Me

Hi everyone. Today there is a new challenge over at One Stitch At A Time and the challenge is "Anything Goes". Below is the card I entered for the challenge.


The topper is digi image from Create with TLC. The topper is a shaker and the backing papers were distressed with a scissor to give the card an edged look onto which I adhered a paper weaved panel. I then attached satin buds to the buttons and on also on the ribbon.

I will also be entering the card for the following challenges:
Craft your Passion Challenge - A card for all occasion
My Mums Craft Challenge - Remind you of a song ( This card reminds of the song Friend Like Me sang in Aladdin)

Until next time, Happy crafting.

Wednesday 12 October 2011

Telescoping Circles

Hi everyone and good morning. Tomorrow is my prince charming birthday. He is going to be ONE and I just can't wait. He was born early and his development and growth has been amazing. Each day I look at him I cannot help but glorify the Almighty God. So to celebrate his birthday I decided to make this fun card I saw over at Barb Mullikin's blog. Its called the telescoping circles but I believe any shape would do.


Until next time, happy crafting.

Monday 10 October 2011

Trellis Card

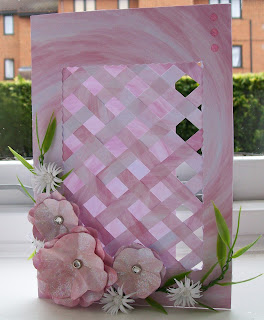
Hello everyone. Today I will be sharing a trellis card. Trellis cards are so pretty and are sure to please the recipient.


You can also add a picture behind the trellis if you don't want to leave it blank.
Until next time, happy crafting.

Friday 7 October 2011

Flowers...

Hello everyone. Today at Polka Doodles, there is a challenge and its all about handmade flower whether it is made by punching, die cutting, stamping, or decoupage. Below is the card I will submitting. The flower is a handmade rose.

The winner of the challenge will be given 3 polkadoodles stamps. Happy crafting.

Thursday 6 October 2011

Tag It.......


Its another challenge at Craft Your Days Away and the challenge is simply TAG IT!!. They want to see tags be it on a card, gift bag or gift as long as there is tag.


The challenge is sponsored by Meljens Designs and you could win four digi's.


Folded Card

Hi everyone, its me again and this time we are doing folded cards just in case you were stuck on doing the same shape of card over and over again.

INSTRUCTIONS
Step 1
You will need two matching cards for this project. Taking your A4 card, fold it in half, whatever the measurement of the card is lengthwise (which should be 15cms) , measure the same down. This should give you a square card.

Step 2
Now overlap the two square cards and glue them together. This will give you a three panel card.
Now you have different choice of folds. In this example, I folded one of the front side-down and the other side-up. You can fold both front downwards in the same direction.

Step 3
Decorate the inside and the front panel with some pretty backing paper.
The decoupage on the card is from The Lilac Garden.


Hope you enjoy making folded card. Until next time happy crafting.

Wednesday 5 October 2011

Rose are sometimes black

Hi everyone. Today is all about flowers. Flowers always add a special touch to a card. I will be sharing how to make dimensional flowers. They are the perfect way to adorn a card without breaking the bank.


INSTRUCTIONS
Step 1
Cut out three six petaled flower with either a punch, die or from a template. You can get the template from Images by Heather M.


Step 2
Cut one of the flowers between two petals to the center. Cut one petal off the second flower and two petals of the third flower. Thus giving you five pieces to make the flower.


Step 3
Take the petals of each of the five flowers and roll it. You can do this by rolling each petal between you fingers or using a cocktail stick.
                                                                Step 4
Having done this add a bit of adhesive (wet glue preferably) to the petal on the right side of the cut. Then slide the petal on the left onto the petal on the right with the adhesive and hold tightly. Do this for 6, 5, 4 and 2 petaled flower.


                    Step 5
Cut a hole at the bottom of the cone of the 5, 4 and 3 petaled flower (not the 2 petaled flower)


Step 6

Apply adhesive to the inside of the cone of the 3 petaled flower. Slide the 2 petaled flower and adhere. Apply adhesive to the inside of the 4 petaled flower and slide the 3 petaled flower to adhere. Apply adhesive also to the inside of the 5 petaled flower, slide the 4 petaled flower and adhere. Roll the remaining single petal, cut off the tip, apply adhesive and stick it into the center of the flower. The end of the 2 petaled flower will be sticking out, you can trim it.

Hope you enjoy making dimensional flowers. Until next time, happy crafting.

Tuesday 4 October 2011

Butterflies.......

Butterflies, butterflies, butterflies. They are such a lovely group of insects and on cards that make such wonderful embellishment. Today I will be sharing how to make paper folded butterflies.

INSTRUCTIONS
For this project you will need two matching sheets of paper. Place your patterned paper down and make your first fold from corner to corner. Crease the paper and then open it out.


Fold and crease again corner to corner in the opposite direction.


Take the pointed end and crease it toward the fold in the paper.


Place your finger in the center, then take the part that is oposite point and fold towards the point.


This forms part of the wing. Do the same for the opposite side.


This is the first part of the wing for the butterfly, now repeat the procedure for the second matching paper.
Try to keep the wings the same size. Below is card I embellished with the folded paper butterfly.


You can add stamens and antennae to the butterfly. I hope you enjoy making folded paper butterfly.
Until next time, happy crafting.

Monday 3 October 2011

October is here

Hi Everyone. October is here and if you are the UK, the weather is fantastic. Its been three days of sun and I'm loving it. Wishing it will go on for the next two weeks. Anyway today am sharing with you a joy fold card and as the name suggest it is indeed a joy to make.


Until next time, remain blessed and happy crafting.